| Main page | Læs denne side på dansk |

|
Drying of wood
First a link to a description of how to build your own moisture meter.If you are interested in knowing more about why the wood cracks and warps dyring drying, and how the moisture content in % is calculated, I have written a page about it here.
It is well-known that wood may crack and warp when it is dried. Below I write about some methods to reduce these problems.
Of course, you can choose to work only in wood bought dry but it is costly and it is limited how thick objects you can make from one piece of wood because it is limited how thick pieces of wood you can dry, especially at a reasonable time (=cost). Dried wood at reasonable prices can be bought from for example Linå or directly from the sawmills.
I mostly work in dried wood. Most I buy, but I dry quite a lot myself. But it gives many new possibilities to use green (fresh, undried) wood, and I find it much more fun to turn wood I've got from my neighbours', family's or friend's garden than to turn in bought wood. If you want to dry your own wood, it is good to know at least a litlle about how to do.
What time of the year is the best for felling the tree? It isn't that important and mostly you can't decide yourself, when the tree is felled. Most important is to get the wood shortly after it has been felled before it has dried too much and has started cracking. But there are advantages of felling from late autumn and during the winter: It is easier to fell and cut up the tree when it doen't have leaves. If you want to keep the bark on the finished project, you should fell the tree in this period as the bark loosens when the growth starts in early spring. Finally, the moisture content is lower in this period so drying takes less time.
 When you have green wood you can choose to:
- Dry the wood before using it
- Rough turn, dry and then finish turning (maybe drying in the microwave oven)
- Turn green and then dry the object
- Use PEG instead of drying
Drying wood for later use
Drying of whole pieces of trunks or thick branches is difficult without getting cracks in the wood. Sometimes you can be successful with it, it depends on the tree species and the thickness of the wood, but most important is to seal the end grain and dry slowly. I have seen a slice of a trunk more than 50 cm in diameter dried without cracks.The sealing of the end grain can be done with many different materials, for example paint, glue, melted wax or paraffin, or 'liquid paraffin'. I prefer 'liquid paraffin' because it is easy to apply and doen't disturb further processing of the wood. I think 'liquid paraffin' is an emulsion of paraffin. It is difficult to find a place to buy it.
 Small trunks and very thick branches should be cleaved (or cut) in half to reduce the risk of cracks. Thicker trunks should be cleaved in smaller sections or cut (or cleaved) into planks.
The critical part of the drying isn't, as you might think, the drying from wet to half dry, removing the about two thirds of the moisture which is the free water. The critical part of the drying starts when the free water is gone and the bound water starts evaporating, usually at a (relative) water content of about 30 %. When the bound water starts evaporating, the wood starts shrinking and then tension is built up in the wood and cracks may start forming.
"but, on an almost freshly felled tree you can soon see cracks forming on the end! Even if it takes years to dry?". That is because the free water evaporates very quickly from the wood very close to the end and then the bound water near the end starts evaporating and the wood near the end starts shrinking - without the rest of the wood has shrunk - and cracks starts forming. Therefore, it is important to seal the end grain immediately after felleing. (Cracks may also from due to tension already present in the wood or from loads during felling and falling of the tree).
The drying time depends on the wood species, temperature, air humidity and, mainly, the thickness of the wood. As a rule of thumb, it takes a year per inch to air dry wood.
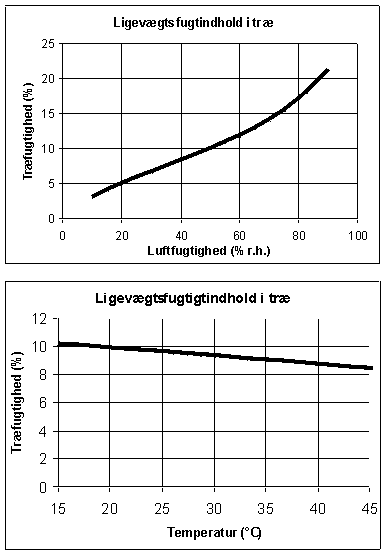
If you leave the wood drying naturally, it will at some point reach an equilibrium moisture content, which isn't zero, but primarily determined by the relative humidity of the surrounding air. The relation between equilibrium moisture content of the wood and the relative air humidity is shown in the upper chart to the right. The chart below (wood moisture vs. temperature) shows that the moisture content of the wood only varies little with the temperature. However, the relative air humidity may change much with the temperature. It makes a big difference if the wood is dried in an unheated or in a heated room.
Gold from the woodpile
Wood from a woodpile often has cracks in the ends because the ends hasn't been sealed. Anyway, you may find useful and interesting wood in a woodpile. Some pieces haven't cracked, and the cracks in the cracked pieces often aren't deep. But rember that thte wood usually isn't dry, exept if it has been in a heated room for a while. If the wood is outdors under cover and has been there so long as to reach equilibrium moisture content, the moisture content may be twice the moisture content for a heated room.Fungus attacs / spalting
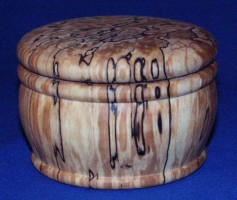
Slow drying often gives problems with fungus attacks that can give dark or bluish discolourations, mainly in the sapwood. Heavier fungus attacks (spalting) may give beautiful colourations of the wood as in the photo to the right. If you want wood with such colorations, you can try to leave the wood outdors in the shade for some time. It is a little difficult to obtain a good result, especially for smaller pieces. The problem for smaller pieces is that the wood dries before the fungus attack has developed. And if you seal the end grain or place the wood in a plastic bag to prevent drying, there are often too few spores to give good colourations. You may lay the wood in water regularly to keep it wet. It is easier with larger pieces of wood. Here you have to take care that the fungus attack doesn't decay the wood too much so that it becomes too weak to turn.
It can be difficult to determine when the spalting is sufficient. You may cleave the wood to have a look inside. When you think it is sufficient, you either have turn the wood soon or dry it. You must remember that the fungi continue decomposing the wood until it is dry. Here a quick drying in the microwave oven may be the solution.
If a spalted piece of wood has become a little too decayed - and it often is in some areas - you may be able to rescue it with some super glue to improve the strength of the wood.
It varies how the patterns from spalting looks in the different wood species. Luckily, some of our native trees with a dull grain like beech, maple and birch can get beautiful spalting patterns.
Rough turning followed by drying and final turning
If you start by rough turning followed by drying the piece and finally finish the turning in dry wood, you can significantly reduce the problems with cracks and fungus decay during drying of large pieces of wood. The green wood is turned to a thickness of about 10 % of the diameter (if it is a bowl), a little thicker if the final wall has to be thick. Then the object is dried slowly while you make a note of the current weight and date regularly. It can be put in a closed paper bag to slow down the drying in the beginning to avoid the surface to be much drier than the inner parts which increases the risk of crack seriously. The paper bag can be placed in a cool room to slow down the drying further and you may also add some wet shavings to increase the air humidity in the bag. When the weightloss has slowed down, the bag can be moved to a heated room and then later opened. Finally, the object is taken out of the bag and left to dry in a heated room for some weeks. The drying time depends primarily on the size (thickness) of the object. Large objects need about three months to dry.Another method is to place the turned object in a closed plastic bag with dry shawings and/or sawdust to absorb the moisture. The shawings are replaced with new dry ones regularly. Also here, the weight is followed and when it doesn't drop anymore, the object is taken out of the bag and placed to dry for some time in a cool room and thereafter in a heated room.
To reduce the risk of cracks during the drying of the rough turned object, you can seal the end grain. Otherwise, the areas with end grain exposed on the surface will dry faster than areas with side grain on the surface, which means that the object will shrink first in the areas with end grain resulting in internal tension with the following increased risk of cracks. I sometimes seal the end grain on the outer side of large bowls but not the inside also to avoid slowing down the drying of the endgrain too much.
For the sealing you can use the same materials as for ordinary drying as mentioned above. Again, I prefer 'liquid paraffin' because it is easy to apply and easy to turn.
The final turning is a little different from turning an object in one process. The object has deformed during drying so if you use a scroll chuck for mounting, the tenon/recess is probably oval and not round now. Try mounting the object with the grain daigonal to the jaws, i.e. the grain going from the gap between two jaws to the gap between the two opposite jaws. If this dosen't give a sufficient grip, you have to turn the tenon/recess round. Read more in the instructions for turning a bowl fron green wood.
Drying in the microwave oven
The microwave oven can be used for drying wood but, of course, it has a size limit for the object to be dried. The advantage in using the microwave is that the heating of the water inside the wood presses the water towards the surface, giving a more uniform drying than if the water just evaporated from the surface.I prefer to dry wood in the 'oldfashioned' manner so I don't have that much experience with drying in the microwave oven. Therefore, I won't give a recipe here, but I will try to give some guidelines.
Basically, you use short heating times with longer cooling times inbetween. It is very important not to heat the object too much. It can take several hours to dry the object this way. The time depends on the size of the object. It the maximum thickness is 5 mm, the drying can be done in under an hour. A rough turned bowl with a wall thickness of 20 mm will take several hours.
You have to be careful to avoid that the wood gets too hot, otherwise it may crack or even get burnt. Actually, the wood can get charred inside with no sign on the outside. Short heating times on low power is the most safe. Don't heat longer than you can take the object out of the oven with your hands. If the wood shows the least sign of cracking, it may be because of uneven drying. Then you may put it in a closed plastic bag until the next day to let the moisture distribute more evenly.
For big objects that can fit in the oven but can't rotate with the oven's turning plate, there is a very high risk that the wood will get burnt because the wood will be heated very unevenly. Even if the wood isn't burt, the heat will be so unevenly distributed that the drying will be very uneven. The object has to be rotated several times during each heating and there is still a high risk that the drying won't be succesful.
One of the disadvantages of the microwave oven is that it is difficult to determine when to stop the drying so that there is a high risk that the wood will be dried too much. Some recommend to weigh the object between each heating and continue to a stable weight but this is WRONG because you have then reached a relative moisture content of 0% and the desired content is between 7 % and 12 %. One possibility is to use a moisture meter with pins on the bottom or inside of the wood object or, better, a contactless moisture meter.
Here are some links to web-pages about drying of wood in the microwave oven: Marshall Gorrow , Woodweb .
Fininsh turning green and then dry
There are more advantages of finishing the turning when the wood is green. Most important is that it is fastest and easiest. You also get the possibility to utilise the deformation of the wood during drying to obtain decorative warped or wavy shapes that can't be made by ordinary turning.If the object has to be finished while still green, the object now has to be sanded wet with sanding paper for wet sanding. Water is used as lubricant and the sanding paper is rinsed in a jar of water regularly.
If you for some reason want to sand dry, you must, of course, wait for the wood to dry. You can the wait until the wood has dried fully but then the object may have warped so much that it can't be sanded in the lathe and then the sanding is quite more tiresome. However, if the wall thickness isn't too small, the surface of the wood is usually dry enough for sanding before the object has warped too much to be sanded in the lathe. You may use a hair drier or similar to dry the surface faster - but carefully.
Only few objects can be fully finished before the wood is dry - even if omitting the application of a finish, that usually can't be applied before the wood is dry. After drying, the object usually has warped so that it can't stand on a table without rocking after drying. Therefore, the bottom has to flattened in some way after drying. To avoid this, you can cut three feet on the object, then it won't rock even if it warps.
The drying itself can also be a problem. You can't seal the end grain as you can with a rough turned item to get a more even drying. Therefore, the drying has to be performed more carefully. On the other side, the walls are thinner reducing the risk of cracking.
Use PEG or other materials instead of drying
One possibility to avoid drying cracks is to replace the water in the wood with polyethylene glycol (PEG). I haven't tried PEG but I think it in most cases will give more disadvantages than advantages. Disadvantages I see are the price, the efforts to apply it, problems with sanding and it is probably impossible to apply further finish. I don't know whether PEG totally eliminates the shrinkage of the wood or it is just reduced. I expect that it will eliminate or significantly reduce warping after drying and, probably, also shrinkage/expansion due to changes in air humidity and themperature. PEG may be bought from Sløjddetaljer.Another possibility is said be to replace the water in the wood with oil. It should be possible to replace the water with oil by submersing the piece in oil - I doubt. The disadvantages of this method would be the same as with PEG.
| Search this site: |