| Main page | Læs denne side på dansk |

|
Sharpening the tools
When starting to learn to turn wood, most people think that the difficult thing is to learn to turn. But soon they dsicover, that sharpening of the tools also requires quite some practice. If the tools aren't sharpened correctly, the tool won't cut well. Many beginners aren't aware of that.The easiest is to use a bench grinder for sharpening of most woodturning tools, but a wet grinder can be used as well, and sharpening by hand with a stone is also possible. Most turners use the tools directly from the bench grinder. Others sharpen the tools further with finer stones and even honing to make the tool razor sharp. Some use a rotating clothe disc to remove burrs. And there are several other ways to do it, and many turners have strong opinions about sharpening. You have to find out yourself what you prefer.
For the bench grinder the white aluminum oxide wheels (or pink or blue) are the best because they don't clog so easily. The cheaper dark grey stones are best suited for soft steel and cast iron. They can be used for sharpening tools, but clean them often. By the way: don't trust the colour of the stone (except for white). Different types of stones are made in many colours so they may be mistaken for another type.
The bench grinder has the disadvantage that it heats the tool significantly and if the tool isn't made from high-speed-steel (HSS), you risk to 'burn' the tool so that it looses it's hardness. You see this from the blue colouring of the steel.
Using a diamond file
Often it will be an advantage to sharpen the tool using a fine diamond file/sharpener. It is very easy and it wears the tool much less than using the bench grinder or wet grinder. After sharpening with the diamond file for some time, it can be an advantage to shapen once on the bench/wet grinder to rebuild the hollow bevel.How to sharpen the tools
How is the correct grind achieved? There are several techniques to be used on the bench grinder or wet grinder.Free hand grinding: means (here) grinding without acessories to help achieve the correct grind. It can be performed at different leves of 'free' hand. In the most free technique, the toolrest on the grinder isn't used and the tool is held by hand and is, except for that, only touching the grinding wheel. Next level is to support the hand on the toolrest, next level is to support the tool on the edge of the rest, which is probably the most common. Start practicing free hand grinding with the tool on the rest.
When grinding free hand you have no aids to obtain the correct angle of the bevel and shape of the grind. It often happens that you grind with a gradually changing bevel angle. If you aren't sure that you can see if the angle is correct, you can measure the angle from time to time.
In the beginning, it is a good idea to try to place the tool on the rest, let it touch the stone and tilt it slightly up and down to have an idea of how it feels when the bevel is in contact with the stone. The feeling is quite different when the wheel is spinning, but anyway, it gives a better idea of how it should feel.
To counteract the pressure from the stone rotating downwards, you have to add a slight pressure upwards. Otherwise, you wil grind most at cutting edge and the bevel will get shorter and shorter.
Adjust the angle of the toolrest. It may be easier to use the toolrest of the grinder to give the correct bevel angle by adjusting the angle of the rest. The tool is laying on the flat surface of the rest during the grinding and you just have to rotate the tool to grind the whole bevel. Some grinds of some tools are difficult to do freehand, for example the 'Irish Grind' of the bowl gouge, and for these, it can be very good to utilise the surface of the grinder's rest.
The disadvantage of this technique is that it is often difficult to adjust the rest angle precisely and if you grind more tools in this way, you have to adjust it frequently. If you adjust the rest frequently, you may gradually change the bevel angle of the tool without noticing, so it is advisable to measure the bevel angle from time to time.
Use of grinding acessories ('jigs'): There are a large number of different acessories/jigs for sharpening woodturning tools for sale. The one called the 'O'Donnell jig' is very simple and very effective. Is is basically a new toolrest for the angle grinder but made in a way so that you can easily adjust it to a new angle. It also has a much larger surface making it much easier to hold the tool flat against it. The disadvantage is the price. You may make your own from some pieces of wood, see for example Brian Cliffords suggestions. I haven't tried the many other types of grinding acessories.
You can also make your own acessory from a piece of tube. Read my description here.
Grinding in general:
When sharpening a tool on bench grinder or wet grinder you should have a loose grip of the tool just holding the handle with the fingertips, so it is easily rotated. If the handle is long enough it can rest on the hip for better control. As when turning, it can be helpful to place the tool against the stone a little higher than needed to get the bevel in contact and then move it down until the whole bevel is in contact. It takes some time to learn to know when the position is correct. You can listen to the grinding sound, watch when sparks flies over the cutting edge, dust colouring the tool close to the edge and after some time you get the feeling of when the position is correct.
It is difficult to sharpen the tool in one movement, and it isn't necessary either. The easiest is to place the gouge with the flute pointing up and rotate it around the tools axis until the one half of the bevel is ground. Then the tool is rotated fast and with no pressure towards the grinding stone back to the initial position and from there, the other half of the bevel is ground.
The grind doesn't have to be perfect with one continuous bevel. The tool can cut fine even if the bevel has several facets. But close to the cutting edge there should be a decent continous area. However, there are many opinions about that....
Using a wetstone. If you don't have a bench grinder or a wet grinder, you can sharpen the tool on a flat wetstone. I havent done that much, but one thing is important: To keep the bevel in contact with the stone to avoid having a round (convex) bevel. You can use a traditional natural or ceramic stone or a modern diamond 'stone'. By the way, the small hand held diamond sharpeners are very useful for sharpening turning hooks and other tools that are difficult to sharpen on a bench grinder, or for precious tools where you want to remove as little material as possible.
Tip: independent of method, it is a good idea to colour the bevel with a black marker, especially when practicing. Then you can easily see if the whole bevel has been ground. If an area hasn't been ground, the rest can be coloured again before you continue the grinding.
What is the correct grind?
It is impossible to say what is the correct grind of a tool (even though some people do). It depends on it's use and on your personal taste. For example, you can use a larger angle for hard wood than for soft wood, but you can also use the same angle for all wood. The grind also depends on the turner's technique and skill. For example, see Johannes Michelsen's special bowl gouge grind. A rule of thumb: a smaller angle gives a sharper tool with a shorter lasting cutting edge. However, I will try to give some guidlines for the grinding.
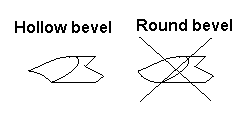
To give the best control of the cut, the bevel has to be flat or slightly concave (which is the natural shape it get from the grinding wheel), not convex/rounded. This is shown in the illustration to the right. However, there are more opinions about that, and some turners even prefer a convex bevel, at least for some purposes!

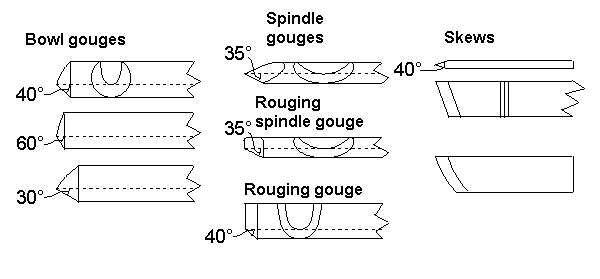
 The bowl gouge is usually ground to an angle of about 40-45°. For turning in deeper bowls or shallow corners, a larger angle is useful. Smaller angles may be used for soft wood and larger angles for hard wood. In total, angles of about 30 til 70° are used.
The simplest grind of the bowl gouge is to hold the bevel against the grinding wheel and just rotate the tool around it's axis. Some prefer to swing the handle towards the side when approaching the side of the bevel. Others move the tool a little higher on the grinding wheel towards the sides of the bevel.
The bowl gouge can be ground in a lot of other ways, for example 'fingernail grind/swept-back grind', 'Irish grind' or 'nib gouge'. Search the web for more information on alternative grinds. I like the 'Irish grind' very much and will maybe later write about it.
The spindle gouge is usually ground with a sharper angle than the bowl gouge, but it may vary 30-50°. It can be ground just by rotating the handle. It is usually ground quite far up on the sides for common use, but it can also be ground as a roughing tool with the whole grind perpendicular to the tool axis giving a straight cutting edge. This grind is simialr to the basic grind of the bowl gouge shown above
The skew is one of the most useful turning tools (after the bowl gouge). It looks simple, but it is a little difficult to sharpen. It can be ground with a straight or a slightly curved cutting edge as shown in the illustration above. The cutting edge can also be perpedicular to the side of the tool, which is easier to grind, but seldom used, because it is then more difficult to use the tool. It always has two bevels, one on each side of the tool. The grinding angle is typically 30-40°.
The skew is sharpened by placing the tool with the bevel on the grinding wheel with the cutting edge parallel to the wheel axis. Because of the angle of the cutting edge, it may be difficult at many grinders with small rests because the tool gets outside the rest. If the cutting edge is wider than the grinding wheel, the tool has to be moved from side to side. If the cutting edge is curved, the tool must be moved accordingly, always with the part of the cutting edge in contact with stone parallel to the wheel axis. The skew is ground on both sides. You may grind each side every other time.
Roughing gouges are ground like the basic grind of the bowl gouge shown above.
Parting tools can be ground with one bevel of about 50-70° or two bevels with an angle in between of 50-70°. If the parting tools has one bevel, it often has a flute in the narrow surface opposite to the bevel (se photo under instructions in using the parting tool).
Scrapers are ground with an angle of about 60-80° but the angle isn't that important.
Grinding and sharpening of other types of tools
Knives for woodworking are usually ground to an angle of about 20-25°. Knives for kitchen use, hunting and fishing are usually ground to a larger angle, typically 35-40°. Vegetable knives are ground to a slightly lower angle, about 30-45°.Axes are typically ground to an angle of 30-45° but for carving axes the angle can be smaller.
| Search this site: |